 Lasagna gardening?!?
What is Lasagna Gardening? Well, Lasagna gardening is a time saving organic gardening method developed by gardener and writer, Patricia Lanza, which requires no digging, no tilling and no sod removal. Too good to be true? right? ... wrong!!! It works VERY well, well enough that you do not have to do much work at all : )
Lasagna Gardening is a nontraditional organic gardening method that relies on a layering method called "sheet composting." The name "Lasagna," comes from the way garden beds are created from layers, the same way you layer ingredients when making lasagna. Watering and weeding are reduced through the heavy layers of mulch and by planting crops close together. The lasagna layering method quickly builds soils that are incredibly rich in nutrients, resulting in higher than average garden productivity. Everything we talked about in part I is here... fungi, bacteria, nematodes, brown and green material.. its all here! Worms will flock to your spot as time progresses or you can add them from another garden or buy them ( thy are very pricey!).
LASAGNA-MAKING 101 !
Before you buy the first plant, or lay down the first sheet of wet newspaper, take a look around your property. Check to see where you get the best light; that's where you'll put your garden. Decide on the shape and contents of your garden. The size of your plot will determine how much material you need to make your first lasagna. Your material list will change depending on where you live. Some folks have more leaves than others, some have seaweed, others ground cornstalks or apple pulp. Some of the lucky ones have access to animal manure. There's no hard and fast rules about what to use for your layers, just so long as it's organic and doesn't contain any protein (fat, meat, or bone).There's no such thing as work-free gardening, but the lasagna method is close. Once you train yourself to think layering, and learn to stockpile your ingredients, you will work less each year. You can make a lasagna garden at any time of year, but in the fall is the best time. Cover the entire bed area with a blanket of eight to ten inches of chopped leaves or other organic mulch. Each spring, feed the bed compost enriched with manure. Keep the soil evenly moist over winter, if rain or snow are light or you have sandy soil. In Spring, cover the soil with a good mulch to keep the soil cool, the leaves clean, and the garden weed-free.
Collect your materials, what you have access to in our list here.... It is not meant to be an expensive or cumbersome process, but utilizes locally available materials that are recycled into soil!
Thick layers of organic mulch are the main ingredients of every lasagna garden.
Anything you'd put in a compost pile, you can put into a lasagna garden. The materials you put into the garden will break down, providing nutrient-rich, crumbly soil in which to plant. The following materials are all perfect for lasagna gardens:
- Grass Clippings
- Sawdust
- Chopped Leaves
- Fruit and Vegetable Scraps
- Coffee Grounds
- Tea leaves and tea bags
- Weeds (if they haven't gone to seed)
- Animal Manure
- Compost
- Wood ash
- Seaweed
- Shredded newspaper or junk mail
- Pine needles
- Spent blooms, trimmings from the garden
- Peat moss
If you choose to make a lasagna garden in spring or summer, you will need to consider adding more "soil-like" amendments to the bed, such as peat or topsoil, so that you can plant in the garden right away. If you make the bed in spring, layer as many greens and browns as you can, with layers of finished compost, peat, or topsoil interspersed in them. Finish off the entire bed with three or four inches of finished compost or topsoil, and plant.
How to put it all together!
To make a lasagna garden you stake out your garden site and begin building up the beds layer by layer. The first layer involves laying down something heavy over sod, like thick pads of newspaper or flattened cardboard boxes, to kill the existing grass, weeds or cover poor clay soil or slightly too rocky a space.. The next layer should consist of 2-3 inches of a water absorbent material like coir, or peat moss. Next, a 4-8 inch layer of organic material, such as compost, is spread over the coir layer. Another layer of coir, or a peat alternative would be added on top of that, and then yet another layer of organic material, like grass clippings on top of the coir, and on and on until the beds reach 18-24 inches high. Finally, the tops of the piles may be sprinkled lightly with bone meal and wood ash (from your fireplace, cooled of course) for added phosphorus and potassium.
At this point, some gardeners elect to "cook" their lasagna gardens (give the layers of mulch time to breakdown). This reduces the height of the beds and produces high-quality workable soil more quickly. Cooking the beds is a good idea, let things cool down and meld, but certainly not necessary. One of the greatest advantages to the lasagna gardening method is that you can layer your beds and plant your crops all in the same day.
How to plant your herbs, flowers or vegetables is easy!
When you're planting a lasagna garden, no digging is required. For
transplants, simply pull back the layers of mulch, drop in the plant
and push some mulching materials back over the roots. Sowing seeds is
easy, too. Sprinkle a little finished compost over the area you want to
plant, sow the seed, and cover it with a little more of the finished
compost. Press down on the bed to secure the seeds and water
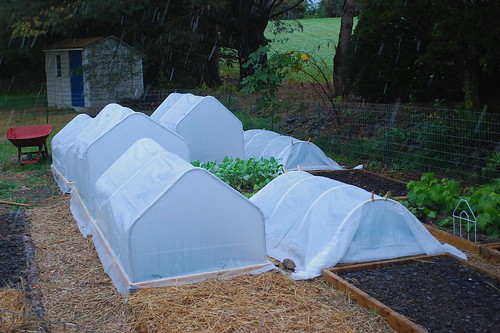
thoroughly. You could cover the row or area planted with weed fabric as a blanket. Inexpensive weed fabric that is gray instead of black only as the black will not help the seedling, it will however add warmth. When the seeds have germinated and temps are adequate for the crop, remove the fabric and save it for another year. I am on my 3rd year using mine! There is also a thin white fabric sold as a cover for organic gardens. It is usually laid out over a row of hoops, tall enough to allow growth and air space. Here's a picture:
Burpee seed company sells them, other companies do too... here's a link to the Burpee product
Planet Naturals floating row covers
Johnny Seed's covers + insect barriers!
Garden'sAlive! Floating row covers and insect barriers... request a catalog, get $5 off 1st order!
They are not expensive and can be reused...
Here is an alternative method of construction, same general principle:
No comments:
Post a Comment
Hello and Thanks for Posting - Check back to see if your post creates a BUZZ !